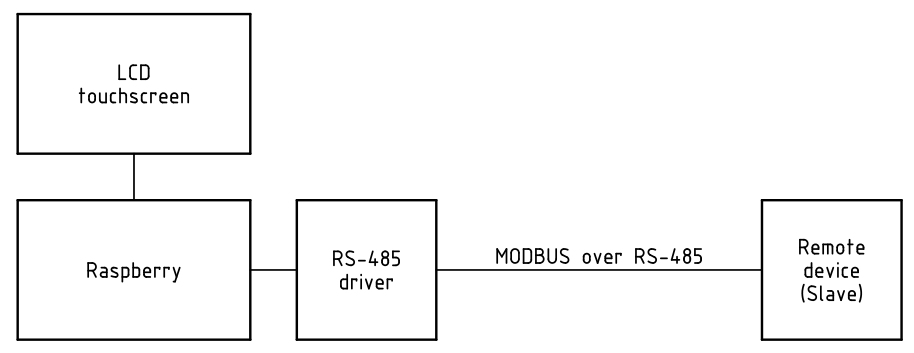
Basically, the system consists of 2 parts, placed at the distance from hand-reach to 100-200 meters:
I'm going to use Raspberry Pi Zero, but I want to be able to use the RPi 3 with the HDMI display the mouse-keyboard at the development stage.
The preliminary experiments show a good chance of success. Now I'm in the state of developing the software for Raspi and adapting the firmware of the Slave. And, since my "tries and exceptions" have consumed a lot of time and efforts, I want to note my steps for the future use.
The overall outline:
- OS Primary - write SD card
- OS Cleaned - purge some software
- SF Added - install additional software
- Card Backup - for the future cloning
- Project - clone and develop, if need be
- Hardware Settings - switch to the real hardware (Zero Pi)
- Card Protective - minimize WRITE operations (root RO overlayed)
Step 1. OS Primary
1.1. Downloads and preparations
I create a directory on my file server to keep all I need in Raspi setup.
The path to it:
export RPITKM16_PATH="/mnt/vol1/rpi/tkm16"
The directory contains:
- 2017-11-29-raspbian-stretch.img
- modbus_tk-0.5.8.tar.gz
- LCD-show
- switch2hdmi.sh
- switch2lcd.sh
- wpa_supplicant.conf
First 2 files are downloaded, the 3-rd directory is extracted afterward, the rest is as simple as:
switch2hdmi.sh
#!/bin/bash
cd ~/LCD-show
./LCD-hdmi
switch2lcd.sh
#!/bin/bash
cd ~/LCD-show
./LCD35-show
wpa_supplicant.conf
ctrl_interface=DIR=/var/run/wpa_supplicant GROUP=netdev
update_config=1
country=GB
network={
ssid="<Wi-Fi AP SSID>"
psk="<password>"
key_mgmt=WPA-PSK
}
Now it's enough to load the SD card from my desktop PC.
1.2. OS to SD card
Check the drive letter
df -h
(note the drive letter of the SD card, e.g. sdb)
sudo dd bs=4M if=$
RPITKM16_PATH/2017-11-29-raspbian-stretch.img of=/dev/<drive-with-a-letter> conv=fsync status=progress
sample command:
sudo dd bs=4M if=$
RPITKM16_PATH/2017-11-29-raspbian-stretch.img of=/dev/sdb conv=fsync status=progress
...after several minutes the card contains all necessary to run Raspbian on the RPi. But the SSH is disabled in modern Raspies. We have to activate it if the Raspi will be headless (at least without the mouse-keyboard).
1.3. Enable SSH
To enable SSH in the Raspi we need to mount the card. Extracting/inserting the card create automount point <mp> = /media/user. Then:
1) add the empty ssh file in the /boot directory (Raspi will remove it later):
touch <mp>/boot/ssh
sample:
touch /media/user/boot/ssh
2) the Wi-Fi configuration file placed temporarily to the same directory (Raspi will move it later):
cp $RPITKM16_PATH/wpa_supplicant.conf <mp>/boot/
sample:
cp $RPITKM16_PATH/wpa_supplicant.conf /media/user/boot/
Now, when the Raspi starts, it will connect to Wi-Fi access point automatically. And we can SSH it.
Note on SSH. To use a simple <SSH-name> instead of IP:
Add the WiFi dongle MAC address to the fixed IP in the router DHCP table. Add a new host descriptor to the desktop PC file ~/.ssh/config:
Host zerod
HostName 192.168.0.101
User pi
Host rpi-3
HostName 192.168.0.102
User pi
I use the single dongle for all Zero Pi-s (zerod of 'dongle'), and for the every new RPi 3 I add the new DHCP client in my router and the new host descriptor (rpi3-2, rpi3-3, etc.)
1.4. modbus_tk package to SD
cp $RPITKM16_PATH/modbus_tk-0.5.8.tar.gz <mp>/rootfs/home/pi/
sample:
cp $RPITKM16_PATH/modbus_tk-0.5.8.tar.gz /media/user/rootfs/home/pi/
1.5. LCD driver and switch-scripts to SD
cp $RPITKM16_PATH/LCD-show <mp>/rootfs/home/pi/
cp $RPITKM16_PATH/*.sh <mp>/rootfs/home/pi/
sudo chmod 0777 <mp>/rootfs/home/pi/*.sh
sample:
cp -r $RPITKM16_PATH/LCD-show /media/user/rootfs/home/pi/
cp RPITKM16_PATH/*.sh /media/user/rootfs/home/pi/
sudo chmod 0777 /media/user/rootfs/home/pi/*.sh
1.6. UART
The well-known issue with the special treat of the hardware UART in the RPi 3 has to be dealt with.
Open the <mp>/boot/cmdline.txt with a text editor and delete 2 items containing ttyAMA0 string:
console=ttyAMA0,115200 rbdboc=ttyAMA0,115200
Save the file.
Now disable the Bluetooth: in <mp>/boot/config.txt add a bottom line
dtoverlay=pi3-disable-bt
I've tried to add enable_uart=1 or enable_uart=0 in the same file, but, seemingly, it doesn't matter. Still, it has to be checked. Maybe, it depends on what Raspi I use.
1.7. Checkout
I must see on the SD card:
<mp>/boot/ directory:
cmdline.txt - without the ttyAMA0 items
config.txt - with dtoverlay=pi3-disable-bt line
ssh (till the 1-st boot)
wpa_supplicant.conf (till the 1-st boot)
<mp>/rootfs/home/pi directory:
LCD-show/ directory
modbus_tk-0.5.8.tar.gz
switch2lcd.sh
switch2hdmi.sh
1.1. Downloads and preparations
I create a directory on my file server to keep all I need in Raspi setup.
The path to it:
export RPITKM16_PATH="/mnt/vol1/rpi/tkm16"The directory contains:
- 2017-11-29-raspbian-stretch.img
- modbus_tk-0.5.8.tar.gz
- LCD-show
- switch2hdmi.sh
- switch2lcd.sh
- wpa_supplicant.conf
First 2 files are downloaded, the 3-rd directory is extracted afterward, the rest is as simple as:
switch2hdmi.sh
#!/bin/bash
cd ~/LCD-show
./LCD-hdmi
switch2lcd.sh
cd ~/LCD-show
./LCD-hdmi
switch2lcd.sh
#!/bin/bash
cd ~/LCD-show
./LCD35-show
cd ~/LCD-show
./LCD35-show
wpa_supplicant.conf
ctrl_interface=DIR=/var/run/wpa_supplicant GROUP=netdev
ctrl_interface=DIR=/var/run/wpa_supplicant GROUP=netdev
update_config=1
country=GB
network={
ssid="<Wi-Fi AP SSID>"
psk="<password>"
key_mgmt=WPA-PSK
}
Now it's enough to load the SD card from my desktop PC.1.2. OS to SD card
Check the drive letter
df -h
(note the drive letter of the SD card, e.g. sdb)
sudo dd bs=4M if=$
RPITKM16_PATH/2017-11-29-raspbian-stretch.img of=/dev/<drive-with-a-letter> conv=fsync status=progress
sample command:
sudo dd bs=4M if=$
RPITKM16_PATH/2017-11-29-raspbian-stretch.img of=/dev/sdb conv=fsync status=progress
...after several minutes the card contains all necessary to run Raspbian on the RPi. But the SSH is disabled in modern Raspies. We have to activate it if the Raspi will be headless (at least without the mouse-keyboard).
To enable SSH in the Raspi we need to mount the card. Extracting/inserting the card create automount point <mp> = /media/user. Then:
1) add the empty ssh file in the /boot directory (Raspi will remove it later):
1) add the empty ssh file in the /boot directory (Raspi will remove it later):
touch <mp>/boot/ssh
sample:
touch /media/user/boot/ssh
cp $RPITKM16_PATH/wpa_supplicant.conf <mp>/boot/
sample:
cp $RPITKM16_PATH/wpa_supplicant.conf /media/user/boot/
Now, when the Raspi starts, it will connect to Wi-Fi access point automatically. And we can SSH it.
Note on SSH. To use a simple <SSH-name> instead of IP:
Add the WiFi dongle MAC address to the fixed IP in the router DHCP table. Add a new host descriptor to the desktop PC file ~/.ssh/config:
Host zerod
HostName 192.168.0.101
User pi
Host rpi-3
HostName 192.168.0.102
User pi
I use the single dongle for all Zero Pi-s (zerod of 'dongle'), and for the every new RPi 3 I add the new DHCP client in my router and the new host descriptor (rpi3-2, rpi3-3, etc.)
cp $RPITKM16_PATH/modbus_tk-0.5.8.tar.gz <mp>/rootfs/home/pi/
sample:
cp $RPITKM16_PATH/modbus_tk-0.5.8.tar.gz /media/user/rootfs/home/pi/
cp $RPITKM16_PATH/LCD-show <mp>/rootfs/home/pi/
cp $RPITKM16_PATH/*.sh <mp>/rootfs/home/pi/
sudo chmod 0777 <mp>/rootfs/home/pi/*.sh
sample:
cp -r $RPITKM16_PATH/LCD-show /media/user/rootfs/home/pi/
cp RPITKM16_PATH/*.sh /media/user/rootfs/home/pi/
sudo chmod 0777 /media/user/rootfs/home/pi/*.sh
The well-known issue with the special treat of the hardware UART in the RPi 3 has to be dealt with.
Open the <mp>/boot/cmdline.txt with a text editor and delete 2 items containing ttyAMA0 string:
Save the file.
Now disable the Bluetooth: in <mp>/boot/config.txt add a bottom line
dtoverlay=pi3-disable-bt
I've tried to add enable_uart=1 or enable_uart=0 in the same file, but, seemingly, it doesn't matter. Still, it has to be checked. Maybe, it depends on what Raspi I use.
I must see on the SD card:
<mp>/boot/ directory:
cmdline.txt - without the ttyAMA0 items
config.txt - with dtoverlay=pi3-disable-bt line
ssh (till the 1-st boot)
wpa_supplicant.conf (till the 1-st boot)
<mp>/rootfs/home/pi directory:
LCD-show/ directory
modbus_tk-0.5.8.tar.gz
switch2lcd.sh
switch2hdmi.sh
Step 2. OS Cleaned
At this point, I do need a target system. In the final device, it has to be the Raspberry Pi Zero. But for the developing stage, it's more convenient to work with more powerful Raspberry. So here are variants:
- Zero Pi (real target) plus, minimally, a WiFi dongle to run SSH on it from my desktop PC. To run the Python scripts under development there has to be some sort of display - an LCD 3.5" touchscreen will be used in the device;
- or Raspberry Pi3 as a surrogate or cross target. It may be equipped with mouse, keyboard and HDMI monitor and its performance is quite acceptable for the task of testing almost ready software.
I intend to use only SSH, no keyboard connected to Raspi, no display. So, this algorithm is more applicable to the pure headless Raspi. Besides, I consider the Raspberry official methods of setup as ugly and bad documented (I mean Menu -> Preferences and raspi-config tool).
2.1. Update
Asserting the Internet is OK. Then check and apply updates (SSH or terminal):
pi@raspberrypi:~ $ sudo apt-get update
pi@raspberrypi:~ $ sudo apt-get upgrade
Here we have some time to have a cup of tea...
2.2. Delete some software. It frees 683MB
Power off & may save the image of a slightly smaller OS. But for my project, I need a couple of installations.
Step 3. SF added
What software do I need in my RPi-as-HMI system:
- modbus_tk (with dependencies)
- pyqt5
- LCD driver
3.1. MODBUS library
The package modbus_tk-0.5.8.tar.gz is in $HOME directory already (look above)
Install the package (note the explicit Python version!)
pi@raspberrypi:~ $ python3 -m pip install /home/pi/Downloads/modbus_tk-0.5.8.tar.gz
3.2. PyQt5
pi@raspberrypi:~ $ sudo apt-get install python3-pyqt5
3.3. LCD driver
LCD-show and 2 bash scripts are in the $HOME directory (look above).
These simple scripts have to switch between LCD/HDMI modes The switching may be initiated only from the target device and every switching call reboot.
These simple scripts have to switch between LCD/HDMI modes The switching may be initiated only from the target device and every switching call reboot.
Check permissions for execution. If the RPi runs with GUI, add 2 new items to Menu and switch to the work with the big HDMI screen or the 3.5" LCD (A) touchscreen. It is not needed, so far.
Step 4. Back up
Unfortunately, the Raspbian stretches SD card partition during the 1-st boot automatically. At least, I didn't run the raspi-config, but the sudo fdisk -l shows 31,002,624 sectors, which means 16GB space allocated. Yet, less than 4GB is actually used.So, when I try to save the SD card on my PC or file server, I'll create an image file with only 25% of the size used. It is unacceptable.
I calculate the size of data - by the last used sector. Round it up to 4GB (in my case), then copy 1024*4MB into the ZIP-ed file:
sudo dd bs=4M count=1024 conv=fsync status=progress
if=/dev/<drive-with-a-letter> | gzip -c > $
RPITKM16_PATH
/<name>.img.gz
sudo dd bs=4M count=1024 conv=fsync status=progress
if=/dev/sdb | gzip -c > $
RPITKM16_PATH
/20180204-from-rpi.img.gz
Well, the ZIP-ed file is 1.7GB, which is very good comparing with my 1-st one of 16G (the full size of the SD card).
Noting the backward operation (note that sudo moved with the dd):
gzip -dc $
RPITKM16_PATH
/20180204-from-rpi.img.gz | sudo dd bs=4M conv=fsync status=progress
of=/dev/sdb
Next steps - to be continued
No comments:
Post a Comment